Wednesday 20 March 2019

Egyptian Cat


Morning all it's a lot brighter here today.
The sun is shinning and the wind has dropped
perfect for the first day of Spring.

Today's card is one I created for the launch of the 
Egyptian Collection by Tattered Lace.
Three sets of the dies were used
The Egyptian Cat
The Egyptian Florals
and the Triangle set.
I also used papers from the USB for the background.

The card is A5 with the fold at the top, tent style.
I added a black matt layer and a layer of patterned paper.
I used the triangle die to cut the middle part into 5 pieces
and the cut the top and bottom into tile shapes.
I then layered each piece onto the black matt with 3Dfoam
to add a bit of dimension.

Next I printed out the matching Charisma sheets
 for the cat and the florals and created my own decoupage.
After die cutting them out I placed them on the card, 
cutting the florals apart to make it a wider arrangement.

The final touch was to add gems to the corner of each
section to help define the edges.

So many cards to share with you over the next 
few days from this collection. 
Hope you will pop by to take a look .

Bye for now
Happy crafting

Jen xxx
Saturday 16 March 2019

Ribbon Delight


Hi there , how you doing?
Not liking this rain and wind we are having at the moment.
Still more to come , or so the weatherman says!!
Oh well more time for crafting..

This card was made for the launch of Corrine's
Trinity Signature Collection
By Tattered Lace on Create and Craft.
Her idea was to provide us with dies, matt dies and stamps
that would work together with our crafty stash to bring it all together.

I am absolutely loving this banner/ribbon/tag. 
I have found it so useful and I am sure you will see it
popping up on a lot of my cards in the future.

The papers are also designed by Corrine and are available on a USB.
This  can be taken into My Craft Studio and layered
with digital masks and overlays, the amount you can
create is endless with so many colour hues available.

The dies make the tails so perfect a match, no longer will you have 
lop sided matts and layers for them.

The card above is really simple to create but I think
it still gives an elegant look.
It's a black A5 card with the fold at the top, tent style.
I matted with a beautiful paper from the USB.
I then die cut 5 back large ribbons and 5 patterned medium ribbons
and cut then to varying lengths, creating an arch sort of shape.
I added them to the card with 3d foam pads.

My next job was to cut the long black banner ,
 by placing the open ended die 
on to the black card, place it through the die cutting machine.
I  then turned it around to cut the tails at the other end,
 by lining it back up to the bit that I had just cut. A perfect and balanced banner.
Repeat the same method for the patterned layer.

I added some 3D florals and some gems to add that finishing touch.
I hope you like it. I think the black makes the pink pop, do you?

Tomorrow I will be adding some more cards created
using the same collection of dies and stamps from Corrine .


Thanks for popping by

until next time 

Jens xxx

Tuesday 12 March 2019

Candle's or Tags


Hi fellow crafter's on this very wet and windy day here in the UK.
Our garden keeps flooding in the corner,
 but not enough to worry about Thank goodness.

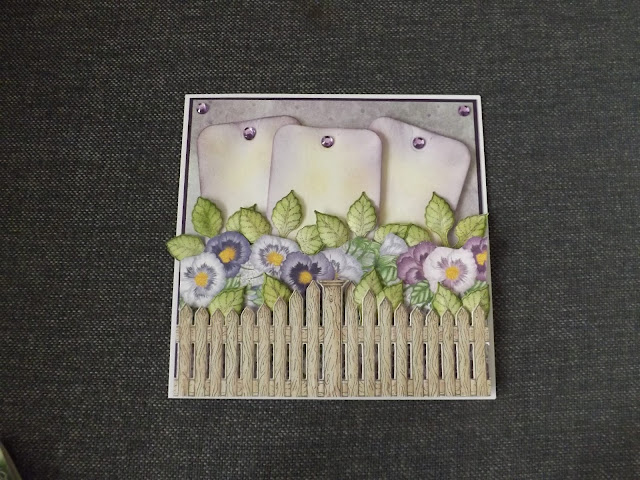
Today's card is from the 'Burst of Spring' (pansies) collection
 by Heartfelt Creations.
I think the main reason this collection appealed to me 
is I just love the picket fence and can see me using it
on so many cards for many occasions.

The idea behind this card was to create a pocket using the Fence.
Filling it with tags and adding loads of 3d flowers.
Now it is finished the more I look at it, I think they look like candle's
What do you think?

It took me approx. two hours to make, including all the stamping and colouring.

I started with a 6x6inch square card base in white.
Matted a layer of purple card and another smaller matt layer in lilac
from the paper pad, part of the Burst of Spring collection.

Next I stamped, die cut and coloured two fence panels,
and a selection of pansies and leaves.
I also created 3 tags with white card and inked with dusty concord.

Once all the components were ready I attached the fence panels
with 3D foam pads. Adding the 3 tags into the pocket the fence
had created, also with 3D foam pads.
Next I added the pansies and leaves, laying them down first to decide on
the layout before gluing them down finally with 3D glue gel.

I added some matching gems to the top corners and also
onto the tags to give a bit of sparkle .

I was going to add a greeting onto the front of the fence panels
but decided I would wait until I knew where it was going!

I am really loving all the new releases from Heartfelt Creations 
along with some amazing designs and dies from Tattered Lace.
I find them both as companies so inspiring and they
have both helped me find my mojo again.

Tomorrow I will be sharing an Egyptian themed card
from Tattered Lace.

Thanks for popping by
Hope to see you again soon

Jens xx

Saturday 2 March 2019

Red Poppy


Hi folks, how the weather has changed today.
 After all the lovely sunshine we now have
 gale force winds on the way and rain!
 Oh well it was nice while it lasted .

Today's card is an easel style, Yes I know lol but they are
my favourite style ,so I am allowed haha.

I have used Tattered Lace Woodside Blooms Circle die
which is just gorgeous. A good size to use as a card base.
I also used some of the paper from the Heavenly Blooms cd
to add some background colour.

I printed out the red poppy 3d Charisma sheet from the cd
and using the Heavenly Blooms Poppy die set,
 cut it out and layered it using 3d foam pads.

I absolutely love these larger flowers.
 So easy to put together, no fiddly pieces
to have to mess around with. All you need to do is
 decide where you want to place it on your card.

I then recut the circle die again and cut it in half to
 make the stopper then  added some gems. All it needs now is a
 greeting when I decide who it is going to sent to .


I have also made some more easels with other die sets 
and different coloured poppies, also from the Heavenly Blooms CD .


I hope you like them and they only took me an afternoon to make all three.

Thanks for popping by

until next time

Jens xx